Price Tags will allow you to create your own price tags within the WhirlWind Software. Once you create your price tags then you will select model numbers by one of two ways. One is simply search in your current inventory and send them to the price tag print queue. The other is a report that has been created in the system to let you know when you need price tags. This report is arranged by location. Each model number is recorded when a price tag is created for it. If the model number is transferred to a new location the price tag date is removed thus allowing it to appear in the price tags needed report for the new location. The second is if pricing for that model number has been updated on the inventory setup card after a price tag has been printed, allowing you to update your pricing in the WhirlWind Software and not leave out dated price tags on your floor. We will explain a few setup options, then how to create tags, then how to send models to the print queue, and finally how to print price tags.
There are a few of setup features that can be implemented.
First is if you always want your highest and/or lowest prices to pull from your
four level pricing then you will need to set the system to know this. Setup this
up by the menu along the top to Setup: Inventory: Inventory Setup. At the bottom
of the setup screen is 'Price Tag Default Highest Price and then Lowest Price'.
![]()
We have another setting for employees that you want to be able to create price tags but do not want to give them the ability to change prices from the default pricing setup above. To set this setting, go to menu along the top to Setup: Payroll: Employees: Find an Existing Employee. On the left side select the employee, then click on the toolbar ‘Rights’. On the bottom right of this screen you will see:
![]()
If this option is selected then when the employee is able to adjust pricing when they send model numbers to the price tag print queue. If it is not then when the employee send model numbers to the price tag print queue, they will have no pricing options and will be directed to the price tag print queue to allow them to print price tags. You can click on the button ‘List’ and you can quickly setup all your employees.
Also Brand Logos need to be setup up. To setup the logo you will need to go to the menu along the top to Setup: Purchasing: Brands:
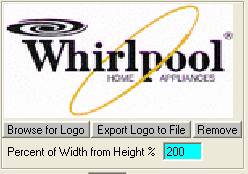
Browse for your logo (we can provide a few logo’s for you). Enter the percent of the Width from Height. For example Whirlpool logo is twice as wide as tall therefore the width is 200 percent of the height. GE Logo is square so it is 100 percent of the height. When selected to print Brand Logos on the price tags the system will fit the logo into the area that you enter.
How to Create Price Tags.
From the menu along the top Inventory: Price Tags Print Queue. Also on the graphical menu you can click on Inventory. There is a new button:

For now what we are concerned with is on the very bottom right of this screen will be:
![]()
You will be asked what you want to do. You can edit existing tags, create new one, or import to your system from ones that we have created.
When you select create new tag then you will need to setup the Name of the tag, how many # of labels across, # of labels down, and some margin features. You will probably need to return to this screen to setup the margins after you have created the tag and do some test prints.
When you return to the main Price Tag Design screen, it will put in the New Price Tag name for you and then you will be asked this question:
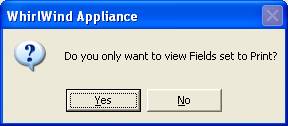
There are several fields that you can add to your price tags. If you are at a point where you have the information that you want but now are only moving them around on the price tag then you will probably want to answer yes to this question. If you are still adding fields to your price tag then click no.
To include fields on your price tags you must select Print YN on the far left of the field. Then next you must fill out the information that is green on that fields you have selected to print. If Center is used it overrides Left. Line box’s can have caption or leave blank to not enter a caption on a line box. A line box is just a box with lines. If you have a caption, then the caption prints where the line is in the top left section of the box.
![]() Button
at the top of this screen is how you get back to the screen where you can edit
the number of tags on one page and also the print margins. You can also change
the name of the price tag.
Button
at the top of this screen is how you get back to the screen where you can edit
the number of tags on one page and also the print margins. You can also change
the name of the price tag.
![]() Button
at the bottom left of this screen will print to your printer a scale of left and
top pixels to help you select your Left, Top, Width, Height numbers.
Button
at the bottom left of this screen will print to your printer a scale of left and
top pixels to help you select your Left, Top, Width, Height numbers.
![]() Button
at the bottom left of this screen allows you to import from the WhirlWind
Software server price tags we have setup.
Button
at the bottom left of this screen allows you to import from the WhirlWind
Software server price tags we have setup.
The best way to view your tag before you print is print to a PDF writer. We do not have a wysiwyg screen.
How to Send Model’s to the Price Tag Print Queue.
There are two ways. The most common will be to search by the Serial Number Inventory lookup screen. Find the model or models that you want to create price tags for and select them with the record selector on the left side of the models. Then right click on the mouse. A menu will appear and the option is towards the bottom ‘Send to Price Tag Queue’.
If you are setup to adjust pricing then you will see this screen:
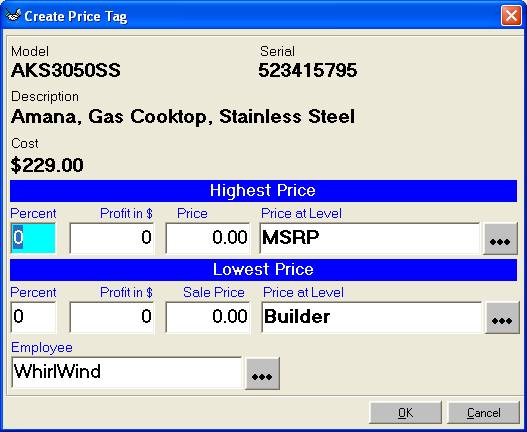
Therefore you can create the percent you want to price at, dollars in profit,
set the actually price, or select a price level pricing. The Employee is stored
to be able to find your own models in the print queue easily.
If you are not setup to view pricing then you will be asked this simple queuestion.
Find Models that
need Price Tags by Location
Go to the Price Tags Print Queue as described above.
![]() click
on this button at the bottom center of screen.
click
on this button at the bottom center of screen.
Select the Location that you are interested in. The report
will load automatically. If you want to change the location, click on the
![]() next
to the location textbox. Then click on the green Go!
next
to the location textbox. Then click on the green Go!
Two main columns that need to be explained are ‘Last Date’ and ‘Outdated Days’.
Last Date is the date that the model had a price tag printed in the
current location you are looking at. Outdated Days is how many days past since
the tag was printed and the pricing was updated on the setup card. To send to
print queue simple highlight model, right click and ‘Send to Price Tag Queue’.
Print Price Tags
Go to the Price Tags Print Queue as described above. You can use the textbox’s at the top of the form to find the model numbers you want to print. Next highlight the models that you want to print. Then click on the button at the bottom left of the screen:
![]()
You will be prompted to select the Price Tag Layout that you want to print with.
Select and click OK at the bottom right. You will be asked for printer. Also on
this screen will be a checkbox at the bottom ‘Print with Page Numbers’. If you
select this feature then a very small number will print in the very bottom right
of each page. Because printers jam and have problems at times, we wanted to give
the user a quick way to remove the printed models in the print queue and remove
the ones that printed ok. Therefore you will be asked ‘What was the last page
that printed correctly?’ If you enter zero all models will stay in the queue. If
you printed 14 pages and only 3 pages printed then enter 3 and the models on the
first 3 pages will be removed. Also on this screen will be a checkbox ‘Print ##
of Price Tags?’ this really is informational so that you know how many labels
you are printing to help you know how many pieces of papers you will need to put
in the printer according to how many price tags print per page.
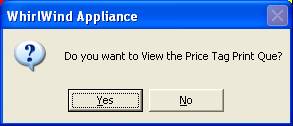
We would suggest that you print price tags to a PDF writer to view before you send them to the printer. After you answer the last page that printed correctly, then the Price Tag Print Queue will load with all the models that are left in the print queue with that print job you just sent to the printer. If all works well and you have all the price tags in your hand there should be no models left in the queue.